SSO Building blocks - SAML, OAuth 2.0 and OpenID Connect

We have already covered SAML at a high level from both user and application provider points of view.
In this post, we'll dive into the technicalities of SAML, OAuth 2.0 and OpenID Connect and how these come together to serve as building blocks for Jackson SSO.
SAML
SAML was designed for traditional web applications in the early 2000s. The goal was to provide a seamless user experience for applications by federating authentication to an IdP. As a result, applications no longer had to maintain identities for users. All they had to do was to redirect the browser to the IdP which would then authenticate the user and return an assertion about the logged-in user. This assertion in effect was a token, asserting to the app that the user authenticated at the IdP and the assertion is valid for the set period contained within it.
While SAML gave us a solution to the problem of SSO or federated identity, it does not address the issue of authorization.
The need for authorization arose with the dawn of Single Page Apps (SPA) and native platforms such as mobile. More and more logic started moving from backend to frontend and an ecosystem of apps that could talk to one another (via HTTP(S)) sprung up. For eg:- You could reserve movie tickets and send invitations to your Facebook friends. This meant that applications started acting on behalf of the end-user, requesting data (friend list) from other services (Facebook). One way we could solve it was by sharing our credentials (for services) with the app. Nothing could be more dangerous than this, because now the application can virtually do anything the user could do. This paved the path for standards like OAuth that provides us with a mechanism to grant controlled and limited access to resources on behalf of the user.
OAuth 2.0
The OAuth 2.0 Authorization framework enables a third-party application/client to obtain limited access to an HTTP service on behalf of the resource owner (or user). In the final step of this process, the client receives a short-lived access token that can be used to access the protected resources.
The flow starts with the app redirecting the user agent to an intermediary Authorization server (AS). The AS authenticates the user and obtains permission from the user to access resources. Once that's done, AS redirects back to the client with an Authorization code. The Authorization code is a grant or a credential representing the user's authorization to be used by the client. In the final step, the client uses this code to obtain an access token. This flow otherwise called Authorization Code grant is one of 4 grant types that are supported. For sake of simplicity, we can omit the others for now.
The above-mentioned flow offers a few benefits:
- The user only authenticates with the authorization server and the credentials are never shared with the app.
- The access token is not transmitted* via the user agent but directly to the client via an HTTP request.
- The Client can be authenticated by the authorization server by using a client secret.
* It's worth mentioning the fact that another grant type 'implicit grant' does return an access token via the user agent in the redirect URL fragment
Using OAuth 2.0 for authentication
Since authentication usually occurs before issuing the access token, it is usually assumed that possession of an access token is proof that authentication happened. The access token is then used to query the Identity API to obtain user details.
However, this does not fully serve as proof of authentication and has several pitfalls:
- The access token is opaque to the client and its intended audience is the protected resource server.
- There is no way to know if the user is still around because information about the authentication event is not exposed.
- In situations where clients get an access token directly in the return URL (implicit grant), there is a high chance that an attacker can inject their malicious token. This can be mitigated by using the Authorization code flow as the token is retrieved from the token endpoint directly.
- OAuth does not define a standard set of fields for the Identity API. For eg:- While one IdP could use
user_idfor the user identifier, the same could besubjectin another one. This requires different handling on the client side from one IdP to another.
A new standard called 'OpenID Connect' which builds on top of OAuth 2.0 brings new artifacts like ID tokens that can serve as reliable proof of authentication and also standardizes things like scope and claims.
OpenID Connect (OIDC)
OpenID Connect 1.0 is a simple identity layer on top of the OAuth 2.0 protocol. It supports 3 flows of which Authorization code and implicit flow are similar to the ones defined in OAuth 2.0. The notable difference here is the return of an ID Token in JWT format (JSON Web Token). The claims in the ID Token help the client reliably confirm the identity of the user. The audience(aud) claim will be set to the client id which means the ID token is intended to be consumed by the client alone. Conforming to the OAuth 2.0 spec, an access token is still returned which can be used to obtain information about the user from the "userinfo" endpoint. OIDC also standardizes the claims in the ID Token as well as the "userinfo" response.
Assembling the SSO puzzle
Now that we have all the pieces of the SSO puzzle, bringing it together in Jackson would look something like the one below.
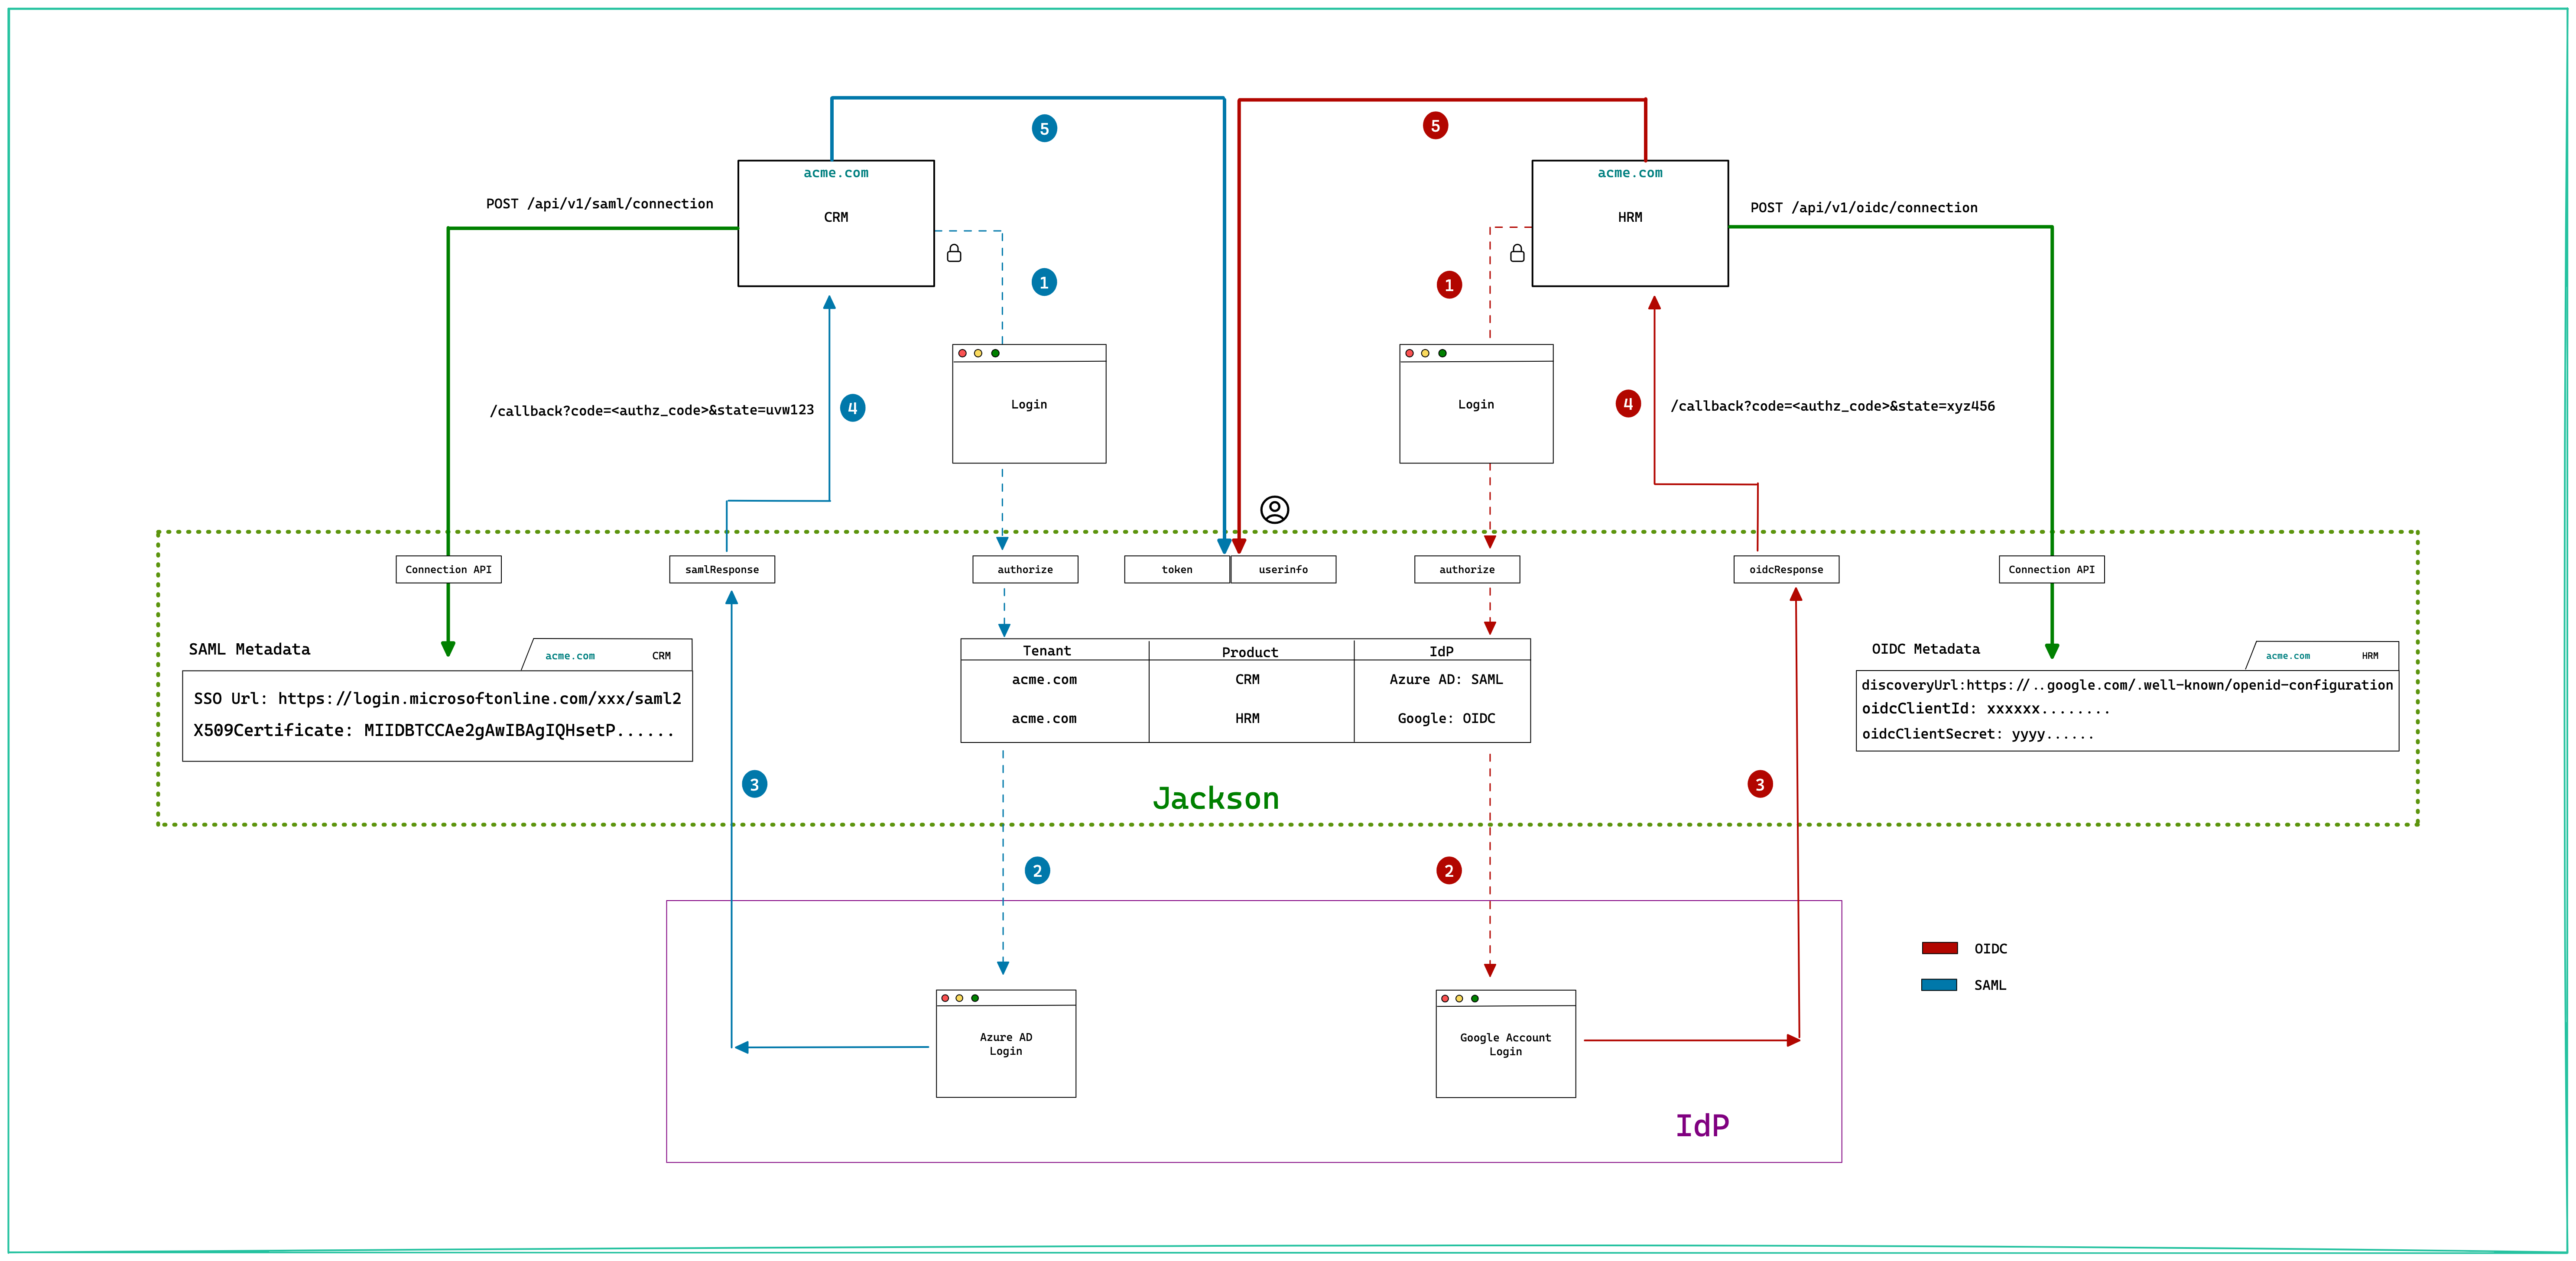
Allow me to explain.
We need to support two kinds of SSO Identity Providers - SAML and OIDC. For the sake of discussion, consider the scenario of two apps where one (CRM) needs to log in with Azure AD via SAML and another (HRM) needs to log in with Google Workspace via OIDC.
Setup SSO Connection
The preliminary step (marked by the green arrow above) is to add the SSO Connection to Jackson. For SAML IdP, this would mean saving the XML metadata from the IdP. The metadata would contain the SSO URL to send the SAML request to plus the public key to verify the SAML assertion signature. In the case of OIDC IdP, we need the discovery URL and client credentials (clientID and clientSecret of the registered app). The discovery URL can be used to query metadata about IdP such as authorization and token endpoints while the client credentials will be used to authenticate the Jackson client orchestrating the OIDC flow.
Login flow
Jackson supports both OAuth 2.0 and OpenID flows. The OAuth 2.0 flow is made secure by supporting Authorization Code flow with PKCE. By including the scope openid in the client request Jackson will switch to OpenID flow.
The login process follows the below steps:
- The Client (Browser app) initiates the login by redirecting to Jackson's
authorizeendpoint. Jackson will parse the tenant/product in the request and use it to redirect the user to the configured IdP. - Step 2 varies based on the Identity Provider type. For SAML IdP, Jackson would construct the SAML request, sign it and send it to IdP. The IdP validates the request and authenticates the user. For OIDC IdP, Jackson constructs an OpenID Connect request and redirects the user to the OIDC Provider authorization endpoint.
- Once the user is logged in successfully, the IdP redirects back to Jackson. For SAML, the response contains the user profile. In the case of OIDC, the response contains the authorization code that is used by Jackson to obtain the token and user profile from the OIDC IdP. Jackson generates a short-lived
authorization codeand stores the user profile against it. - The
authorization codegenerated in the previous step is sent to the client app. - The client exchanges the code for the token and uses it to query the userInfo endpoint of Jackson to get the complete user profile. In the case of OpenID flow, ID Token is returned by Jackson and contains the basic user profile.
Final thoughts
So in a nutshell, Jackson acts as a proxy between the client app and the IdP doing the heavy lifting of orchestrating SAML/OIDC flows with the configured IdPs. This way you can quickly scale your app auth to any number of providers allowing you to focus on your core product.