How to add SAML Single Sign On to an Express app

In this article, you'll learn how add SAML SSO login to an Express.js app. You'll use SAML Jackson with Auth0 to authenticate users and protect routes.
You can also access the full code at the GitHub repository.
Let’s get started!
Prerequisites
To follow along with this article, you’ll need the following:
- Node.js installed on your computer
- Basic knowledge about Node.js and Express.js
Setting up the database
For our article, we’ll create a free Postgres database on Heroku instead of setting up a local Postgres server.
- Go to Heroku signup page, then create an account.
- Go to Apps and click Create new app.
- Give your app a name, and click the Create app button.
- Go to the Resources tab.
- Choose the Heroku Postgres from the Add-ons search box, and click Submit Order Form.
- Click the Heroku Postgres and select Settings tab.
- Click the View Credentials button and copy URI.
Now you have created a free PostgreSQL database and copied the database connection URI. We'll need the connection URI later.
Configure the Identity Provider
We'll use the Auth0 as our identity provider. An Identity Provider (IdP) is a service that manage user accounts for your app.
- First, go to the Auth0 signup page, then create an account.
- Go to Dashboard > Applications > Applications.
- Click the Create Application button.
- Give your new application a name.
- Choose Regular Web Applications as an application type and the click Create.
- Go to the app you created, then click the Addons tab.
- In the SAML2 Web App box, click the slider to enable the Addon.
- Go to the Usage tab and download the Identity Provider Metadata.
- Go to the Settings tab and make below changes.
- Add
http://localhost:3000/sso/acsas your Application Callback URL that receives the SAML response. - Paste the following JSON for Settings, then click Enable button.
{
  "audience": "https://saml.boxyhq.com",
  "mappings": {
    "id": "http://schemas.xmlsoap.org/ws/2005/05/identity/claims/nameidentifier",
    "email": "http://schemas.xmlsoap.org/ws/2005/05/identity/claims/emailaddress",
    "firstName": "http://schemas.xmlsoap.org/ws/2005/05/identity/claims/givenname",
    "lastName": "http://schemas.xmlsoap.org/ws/2005/05/identity/claims/surname"
  }
}
audience is just an identifier to validate the SAML audience. More info.
Auth0 provides database connections to authenticate users with an email/username and password. These credentials are securely stored in the Auth0 user store.
Let's create one so that our users can register or login.
- Go to Auth0 Dashboard > Authentication > Database.
- Click Create DB Connection - Auth0 Create DB Document
- Give your connection a name, then click Create.
- Go to the Applications tab and enable the application you just created.
Now we've everything ready, let's move to the next step.
Getting started
Launch a terminal and clone the GitHub repo:
git clone https://github.com/devkiran/express-saml.git
cd express-saml
Now, install the dependencies:
npm install
Add the environment variables:
cp .env.example .env
Update the DATABASE_URL variable with your Heroku Postgres database connection URI.
Append ?sslmode=no-verify to your database connection URI otherwise Heroku won't allow you to link to the database. This is a Heroku specific configuration.
For example postgres://hcydrtasctfyth:fe001b264322d6cf794@ec2-1-2-3-4.compute-1.amazonaws.com:5432/demo?sslmode=no-verify
About the Express app
This is a simple express.js app created using express-generator. You can use any express.js app if you want.
Our express.js app has only 2 routes.
GET /render a home pageGET /dashboardrender a dashboard
So, what's the plan? We'll add SAML SSO login (via Auth0) to our express.js app so that only authenticated users can access the /dashboard.
Install SAML Jackson
Run the following command to install the latest version of the SAML Jackson.
npm i --save @boxyhq/saml-jackson
Once you installed Jackson, let's initialize it.
Add the following code to the routes/index.js.
// routes/index.js

...

let apiController;
let oauthController;

const jacksonOptions = {
  externalUrl: process.env.APP_URL,
  samlAudience: process.env.SAML_AUDIENCE,
  samlPath: '/sso/acs',
  db: {
    engine: 'sql',
    type: 'postgres',
    url: process.env.DATABASE_URL,
  },
};

(async function init() {
  const jackson = await require('@boxyhq/saml-jackson').controllers(jacksonOptions);

  apiController = jackson.apiController;
  oauthController = jackson.oauthController;
})();
Setting up Express.js routes
Add SAML Metadata
The first route you'll create is the GET /config one. This route will display a form with following fields:
Metadata: Enter the XML Metadata content you've downloaded from IdP.Tenant: Jackson supports a multi-tenant architecture, this is a unique identifier you set from your side that relates back to your customer's tenant. This is normally an email, domain, an account id, or user-id.Product: Jackson support multiple products, this is a unique identifier you set from your side that relates back to the product your customer is using.
// routes/index.js

router.get('/config', async (req, res) => {
  res.render('config');
});
Add a view to display the form.
<!-- views/config.ejs -->

<!DOCTYPE html>
<html>
  <head>
    <title>SAML Config</title>
    <link
      rel="stylesheet"
      href="https://maxcdn.bootstrapcdn.com/bootstrap/4.0.0/css/bootstrap.min.css"
      crossorigin="anonymous"
    />
    <link rel="stylesheet" href="/stylesheets/style.css" />
  </head>
  <body>
    <h1>SAML Config</h1>
    <p>Add SAML Metadata.</p>
    <form action="/config" method="POST">
      <div class="form-group">
        <label for="tenant">Tenant</label>
        <input
          type="text"
          name="tenant"
          id="tenant"
          class="form-control col-md-6"
          required="required"
        />
      </div>
      <div class="form-group">
        <label for="product">Product</label>
        <input
          type="text"
          name="product"
          id="product"
          class="form-control col-md-6"
          required="required"
        />
      </div>
      <div class="form-group">
        <label for="rawMetadata">Metadata (Raw XML)</label>
        <textarea
          name="rawMetadata"
          id="rawMetadata"
          cols="30"
          rows="10"
          class="form-control col-md-6"
          required="required"
        ></textarea>
      </div>
      <button type="submit" class="btn btn-primary">Submit</button>
    </form>
  </body>
</html>
Now let's add another route POST /config that will store the form data by calling the SAML Jackson config API.
This step is the equivalent of setting an OAuth 2.0 app and generating a client ID and client secret that will be used in the login flow.
// routes/index.js

router.post('/config', async (req, res, next) => {
  const { rawMetadata, tenant, product } = req.body;

  const defaultRedirectUrl = 'http://localhost:3000/sso/callback';
  const redirectUrl = '["http://localhost:3000/*"]';

  try {
    await apiController.config({
      rawMetadata,
      tenant,
      product,
      defaultRedirectUrl,
      redirectUrl,
    });

    res.redirect('/config');
  } catch (err) {
    next(err);
  }
});
There are a few important things to note in the code above.
defaultRedirectUrl holds the redirect URL to use in the IdP login flow. Jackson will call this URL after completing an IdP login flow.
redirectUrl holds an array containing a list of allowed redirect URLs. Jackson will disallow any redirects that are not on this list.
Next, let's start the express app. The app starts a server and listens on port 3000 (by default) for connections.
npm start
Now, let's visit http://localhost:3000/config, you should see the page with a form.
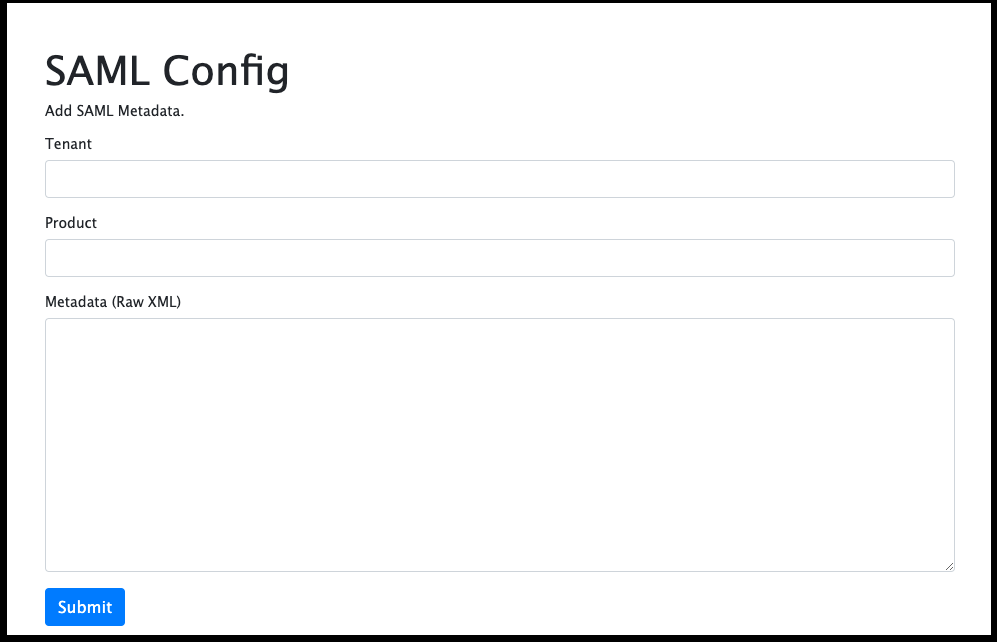
Here you can add the metadata you've downloaded from Auth0. Fill out the form with a Tenant, Product, and paste the metadata XML content as it is.
I'll use 'boxyhq.com' for tenant and 'crm' for product.
The response returns a JSON with client_id and client_secret that can be stored against your tenant and product for a more secure OAuth 2.0 flow.
If you do not want to store the client_id and client_secret you can alternatively use client_id=tenant=<tenantID>&product=<productID> and any arbitrary value for client_secret when setting up the OAuth 2.0 flow.
Redirect the users to IdP
Now you have added the SAML metadata, you'll need a route to redirect the users to IdP to start the SAML authentication.
Let's add a new route GET /sso/authorize.
Don't forget to change the values of the tenant and product in the code.
// routes/index.js

router.get('/sso/authorize', async (req, res, next) => {
  try {
    const tenant = 'boxyhq.com';
    const product = 'crm';

    const body = {
      response_type: 'code',
      client_id: `tenant=${tenant}&product=${product}`,
      redirect_uri: 'http://localhost:3000/sso/callback',
      state: 'a-random-state-value',
    };

    const { redirect_url } = await oauthController.authorize(body);

    res.redirect(redirect_url);
  } catch (err) {
    next(err);
  }
});
oauthController.authorize() will returns a redirect_url. You should redirect the users to this redirect_url to start the IdP authentication flow.
Handle the SAML Response from IdP
This route becomes the Assertion Consumer Service (ACS) URL of your app. The ACS URL tells your IdP where to POST its SAML Response after authenticating a user.
The SAML Response contains 2 fields: SAMLResponse and RelayState.
// routes/index.js

router.post('/sso/acs', async (req, res, next) => {
  try {
    const { SAMLResponse, RelayState } = req.body;

    const body = {
      SAMLResponse,
      RelayState,
    };

    const { redirect_url } = await oauthController.samlResponse(body);

    res.redirect(redirect_url);
  } catch (err) {
    next(err);
  }
});
Call to the method oauthController.samlResponse() will returns a redirect_url. You should redirect the users to this redirect_url. The query parameters will include the code and state parameters.
Code exchange
Now exchange the code for a token. The token is required to access the user profile.
Let's create a new route GET /sso/callback to handle the callback.
// routes/index.js

router.get('/sso/callback', async (req, res, next) => {
  const { code } = req.query;

  const tenant = 'boxyhq.com';
  const product = 'crm';

  const body = {
    code,
    client_id: `tenant=${tenant}&product=${product}`,
    client_secret: 'client_secret',
  };

  try {
    // Get the access token
    const { access_token } = await oauthController.token(body);

    // Get the user information
    const profile = await oauthController.userInfo(access_token);

    // Add the profile to the express session
    req.session.profile = profile;

    res.redirect('/dashboard');
  } catch (err) {
    next(err);
  }
});
In the above code, replace the value for tenant and product with yours.
Protect the dashboard
Now is the time to fix our GET /dashboard route so that only authenticated users can access it.
Let's fix it by adding a condition to check if the profile exists in the session.
If profile is undefined, redirect the users back to the / otherwise display the profile on the dashboard.
Replace the GET /dashboard route with the below code.
// routes/index.js

router.get('/dashboard', function (req, res, next) {
  const { profile } = req.session;

  if (profile === undefined) {
    return res.redirect('/');
  }

  // Pass the profile to the view
  res.render('dashboard', {
    profile,
  });
});
Replace the views/dashboard.ejs view with the below code.
<!-- views/dashboard.ejs -->
<!DOCTYPE html>
<html>
<head>
<title>Dashboard</title>
<link rel="stylesheet" href="/stylesheets/style.css" />
</head>
<body>
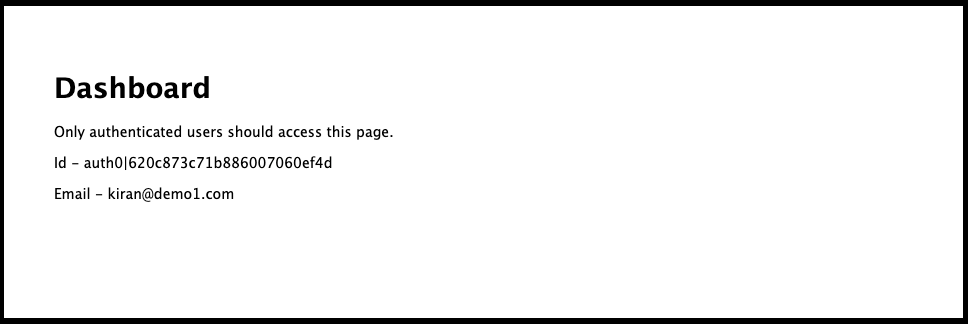
<h1>Dashboard</h1>
<p>Only authenticated users should access this page.</p>
<p>Id - <%= profile.id %></p>
<p>Email - <%= profile.email %></p>
</body>
</html>
From the command line, let's restart the express app then visit the authorize the URL http://localhost:3000/sso/authorize.
If you've configured everything okay, it should redirect you to the Auth0 authentication page, then click on the Sign up link and register there
If the authentication is successful, the app will redirect you to the dashboard and display the id, email of the user.
Conclusion
Congratulations, you should now have a functioning SAML SSO integrated with your express.js app using the SAML Jackson and Auth0.
References
To learn more about SAML Jackson, take a look at the following resources:
Your feedback and contributions are welcome!